Fathers and Sons, Guitars and Violins

My dad passed away last year on the last day of March. He accomplished many of the things he wanted to do in life and he was much loved. Can you do much better than that? He was a man of many interests. One that he retained and cultivated his whole life, was woodworking. He also loved music, taking up the violin when he was 13 and putting it down pretty soon after. Still, he continued to enjoy listening to classical music for most of his days, and as a septuagenarian dove in once again to both the violin, and then the viola. When you combine an early interest in violin, with a life-long interest in woodworking, it must be inevitable that one day you will wish to build one, and so it was with my him. Yet he was nothing if not methodical, so he conceived a plan, a graded plan in woodworking projects to culminate with making a violin.

First he would build a guitar. A pretty complex project to be sure, but simpler than a violin:  the back and top are flat and the curves of the sides are relatively mild. Next up would be a viol da gamba.  When he conceived this plan back in the early 1970’s, the viol da gamba was a pretty obscure Baroque era instrument. With a resurgence in period instrument practice in the years since, it’s still a pretty obscure instrument, but somewhat less so. Anyhow, the viol da gamba is outwardly much like a cello, though it derives from the lute family of instruments. Most importantly for my father’s plan, it shares a similar construction to the violin family, but only the top is carved. The back is flat and the scroll gracing the top of the neck can be somewhat simplified and still be considered traditional —  so, a step up in complexity from the guitar. Finally, after getting through both of those instruments, he would tackle a violin.

He was nearing 50 when he began building his guitar. In less than a year of casual nights and occasional weekends the instrument had taken form but it wasn’t quite completed (his day job as a professor, playing Mr. Fixit to an old house, along with being married and father to 3 kids took some time too). Many things intervened and months passed.  Then years came and went, but the guitar remained unfinished.

I entered my teenage years during this time and at some point got bitten by the guitar playing bug, so the pestering began:  “when are you going to finish the guitar, Dad?” I hate to think how many times I repeated that obnoxious mantra, but to no effect anyhow. The guitar was on hold.

The early 1980’s saw a big lifestyle change for my folks, from city dwellers to country folk as they moved to a 100 acres of land, and not a whole lot else, in rural West Virginia. I was off in college then, coming back in the summers to lend a hand where needed. As the days of one summer passed, a plan of my own began to emerge.  Really, more of a feeble stratagem to compel my dad to finish that guitar:  I would start one myself and maybe that would get him jump-started if I began to make some progress!

I deemed this possible as he had already made all the complicated jigs and forms, there was a nice stash of wood he had collected, there was a bit of a wood-shop up and running, there was the book he had used, and most of all, there was him to help me.  As it was, I was unskilled at woodworking.  My dad, however, was widely read, had tackled a variety of complicated projects, was meticulous, and skilled with hand-tools.  It’s true, I had carved a dish out of mahogany in high school wood shop (I was pretty proud of the blue velvety flocking applied to the bottom) and Dad had taught me how to drill a pilot hole and countersink prior to driving a screw, but really, I had no business starting in on building an acoustic guitar.

Well, my sad attempt to inspire my dad did not come to fruition in the time frame I envisioned —  it was over a decade later before his guitar sounded its first notes. But once I got rolling on my guitar, the thing took on a life of its own. I was absolutely consumed with the project and spent all my available hours on it.  By the end of the summer I was playing on the guitar I had built.  It wasn’t very pretty, but I was kind of amazed that I managed to get the thing together at all and it actually played and sounded pretty good.  More importantly for my future, I had finally found an endeavor that had lit my passion.  I knew from that point on that I wanted to be involved in fine woodworking.

And what of my dad’s plans to build a violin? In the ensuing years, with his guitar finally completed, he moved on to phase two, the viol da gamba. Again, he made good progress in year one, but again, life intervened with many other demands on his time.  Years passed, his health went into decline, and finally, he passed away with the viol uncompleted and the dream of building a violin unrealized.

It was around the time his guitar was finally completed that my wife and I had our first daughter, followed two years later by our second.  When they were very young (two and four) I got the idea that it would be a good thing to start them playing violin.  Fourteen years later, they are both superb musicians.

When my dad died I inherited some specialized violin making tools: calipers, finger planes, reamers, and many books on the topic.  I also inherited a partially built viol da gamba.

I knew I needed to complete his viol da gamba, but only recently did it occur to me that it was also time for me to pickup the gauntlet and complete the violin project he began forty years ago.  This winter I’m planning to build a couple of violins.  They’ll be for my daughters.  I’ll be thinking of my dad while I work:  many fond reminiscences, beginnings and endings, dreams only dreamt and dreams realized.  The outlook ahead is for a nice, warm, winter.  I’ll keep you posted.

Until next time,

df

Posted in Miscellany | 4 Comments

A Barn Beam, A Sofa Table: Part III

After fitting each leg to its respective joint it’s time to join the two halves of the table top.  The edges were hand-planed to a tight fit and then clamped as shown. I don’t use dowels or biscuits for alignment or strength – when the joint is well-fitted and glued with a moderate amount of glue there is very little “skating” as clamping pressure is applied and it is quite easy to align ends and surfaces. Most folks are aware that  a properly glued joint is stronger than the wood so reinforcing the joint for added strength is not very helpful — if the joint is stressed by a heavy weight or shock, the top would likely crack somewhere other than the joint.

I used the over/under approach in clamping up the top in order to equalize the clamping pressure since the stock was so thick.


Next step was to plane the top and then saw the tapers on the legs and plane them as well.

Besides the obvious taper of the leg witnessed from the end view, the legs are also tapered by about 3/16″, getting thinner at the bottom. It’s hard to notice that it is there, but rather noticeable if it is not done: though this is by no means a svelte table, some little touches help avoid a boxy look.


I pre-finished the underside of the table top and the insides and sides of the legs to avoid having to finish inside corners once the legs are glued on. I used an oil/varnish mixture of 3 part varnish to one part tung oil to one part solvent.  I’ve been really pleased with the Sutherland and Welles finishes and solvent which are botanical based and have very low toxicity according to the Material Safety Data Sheets (MSDS). It is very quick drying (about 2 hours in ideal conditions). I use 4 coats wiped on allowed to soak in briefly and then wiped off. I use paper towels for this and then burn the towels in my woodstove or allow them to harden in a metal bucket placed outdoors.

After the finish was applied, the legs were tapped into place with some Titebond glue applied.

Later, the end-grain was cleaned up with a hand-plane then finish was applied to the top and outside of the legs.
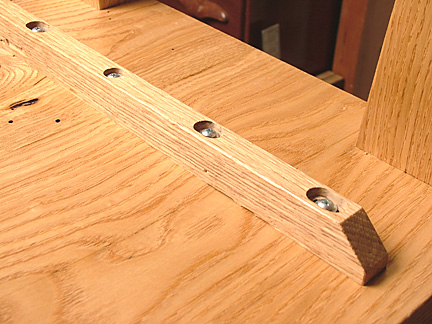
Finally, I made some battens to screw on to the bottom to stabilize

the table-top from any eventual warping.  Slots in the battens allow for cross-grain movement of the top.


And then, it was done.


Until next time,

df

Posted in Wormy Chestnut Sofa table | Leave a comment

A Barn Beam, A Sofa Table: Part II

I have to admit, the last time I tried cutting dovetails in thick stock the results were not what I had wished for.  If you ever stop by my shop you can see them, like I get to nearly everyday. They are on the tail-vise assembly on my workbench.  A constant reminder of the need for humility! I like to think I’ve learned a thing or two in the past 25 years so I took a different approach this time.  The trouble was, back then, I didn’t have a handsaw that was up to the task of sawing dovetails in 3″ thick hard maple with any degree of real accuracy — I still don’t! So, I decided to put my band-saw to work this time.  I did not want to handle the whole glued up table top, so I am cutting the joints in the table top halves before gluing it up.  After sketching out the dovetails I put together this little auxilliary table that I clamp to the bandsaw table (at the correct “drift-angle”) to reproduce the desired dovetail angle.

This is a common approach to “band-saw dovetailing”- nothing that I dreamed up, but here are a few details.  The table can be mounted to either side of the blade to reverse the angle as needed.  The fence is integral to the slanted table, sliding on dovetailed ways to maintain parallel and is clamped in position as needed (with the C-clamps pictured).  There are two slotted, removeable blocks — one is in position and held in place with a wedge — which serve to channel the sawdust below the table to the dust collection port.  The other block is used when the table is reversed.  I scribed the shoulder of the dovetails as is usual, with a marking gauge and simply saw down to that line once the saw fence is set. I am starting with the pins. I cleared out most of the waste, making use of a Grammercy turning saw, which works beautifully for this task:


I follow up with a guide-block clamped in place, smack on the scribe-line, and pare down with a chisel, coming in from both sides, to the middle:

I missed a photo here, but the outline of the  pins are transferred directly to the legs by simply placing then in position on the legs and then tracing around the pins with a sharp drafting pencil. If I then saw right to that line on the waste side and just barely skim the line, to make the “dovetails”  I should end up with a nice fitting joint. I decided to use the bandsaw for this as well, making use of a long wedge with the correct angle, and a bandsaw fence:

I set the fence, then slide the wedge to place the blade where I want it.  Then the wedge and leg are moved as a unit to make the cut.  My dad made this nifty fence using heavy duty magnets that are activated by rotating the knob — there’s one at each end:  two twists and the fence is locked, two twists and it’s loosened.  Very nice.

Again, I used the turning saw, guide block, and chisels to clear out the waste.  Nothing wrong with the results this time!


Until next time!

df


Posted in Wormy Chestnut Sofa table | Leave a comment

A Barn Beam, A Sofa Table

My clients scored a few 9 x 9 beams of wormy chestnut. Some of it was used architecturally: a fireplace mantel and cantilevered shelves to display a lovely collection of Chinese teapots.  We selected this 40″ length to make a sofa table to go opposite the shelves and mantel.  We settled on general dimensions and the general idea — a simple slab with legs dovetailed into the ends.  The legs would be straight tapers to echo the design of the dining table.  Basically, keep it simple.


The first task, pull some nails!


Next, do some milling.  First joint and square two faces.  The hefty beam dwarfs my little 10″ Inca jointer/planer, but it’s up to the task.


Onto the band-saw to re-saw the top and legs.


I use a 6″ high fence clamped to the table and a 1/2″ 4 tpi skip tooth blade.  The chestnut saws easily.


Now to do a little mocking up. The general height, width and length were set based on measurements we arrived at at the home. What I want to accomplish now is to get the thicknesses correct, along with the taper of the legs, their placement and, what the dovetail joinery will look like. I cut an extra piece of the chestnut that was full of deep checks to use as a mock up leg and a couple of chips of veneer to represent the dovetails: I ended up thinning out the top, shrinking the width of the leg and toying around with the dovetail spacing a bit before I was satisfied.


Until next time.

df


Posted in Wormy Chestnut Sofa table | Leave a comment

Recent Workshops

I’ve been doing a lot of teaching lately. That doesn’t help my work output in the shop much, but I have really enjoyed meeting, spending time, and passing along what I know to a great bunch of people. Here are a few of them:


Matthew came to learn plane-making. Here he is checking the function of his just-put-together persimmon plane on some curly maple, with great results!

Michael came down from New Jersey, stayed at the fabulous Mast Farm Inn with his wife and enjoyed a couple of days of plane-making too.


Charlie came on up from Charleston, SC and spent a week in the shop. First he made a coopering plane. Then, he put it to use and got down to building a coopered door out of some spalted anigre he brought along.  Finally, he put together a cherry cabinet (dry fit) for what will become a very sweet wall-mounted jewelry cabinet:

Charlie with his coopered cabinet.


Michael made the journey from Maine. A great admirer of James Krenov’s work, he had previously built a beautiful little Krenov inspired curved door (laminated) wall cabinet made of pearwood for which he still needed to put together the two curved front drawers, but required a bit of assistance.  We spent the week learning about the use of templates to help pull off this sort of challenging half-blind dovetailing.  The drawer fronts were not only curved but the sides were of different lengths, each drawer making up only half the arc of the cabinet front:

I spent the past two days with Aaron, a senior at Appalachian State University from right here in Boone, NC.  He is actively exploring what an education and career in fine woodworking might look like, and I was honored to be his first stop along the way. Plane-making is one of the best introductions I know of to fine woodworking and Aaron got off to a great start with it.  A trip down memory lane for me.  It was about 29 years ago that I was in the same boat — just finished an undergraduate degree, but not feeling too passionate about academics or my possible career path. By chance I learned of Jim Krenov’s Fine Woodworking Program at the College of the Redwoods in Fort Bragg, CA.  After visiting there, I knew without a doubt the direction I wished to head in…still traveling that path.

Until next time,
df

Posted in Private Instruction | 1 Comment

17-inch Jointer Plane Auction Ends

The auction for the 17-inch Red Oak Jointer Plane and doussie and brass adjusting hammer ended at 9 PM EST tonight.  The winning bid was $375.  Thank you Matt! This sale generated $320 for the College of the Redwoods, James Krenov Scholarship Fund.


Until next time,
df

Posted in Miscellany | 2 Comments

Guitar 26 — 8th Installment — The Neck (cont’d)

Before  with continuing neck shaping, a quick mention: tonight, 9 PM EST the benefit auction of my 17-inch red oak jointer plane closes.  The current high bid is at $355.  The beneficiary, the James Krenov Scholarship Fund at the College of the Redwoods Fine Woodworking Program. See my News and New Work web page for details on participating.

The heel is roughly carved:


Then the neck/peg-head junction:

The neck is planed to near final thickness at the peg-head end.


After tapering the neck uniformly to the heel, shaping the contours with draw-knife and spokeshave begins.

More refinement with a variety of cutting tools.

Closing in on the final heel shape

Neck/peg-head transition rough shaping

Shaped and polished.

The heel has been final shaped. Final fit of the heel to body is double-checked.


The neck is completely shaped and has its first of several coats of oil and varnish mixture finish.

Until next time.

df

Posted in Guitars | Leave a comment

Newsletter April 17th, 2012

David Finck Woodworker      Spring 2012
Notes From the Bench…

An occasional (very occasional) newsletter


Project Blog
In October I started chronicling my daily work in the form of an ongoing photo essay. I hope you’ll find time to stop by for an occasional visit: http://www.davidfinck.com/blog/.
You’ll see what I am currently working on, gain some insights into my woodworking methods and madness, and keep up with my plans for the future. I’d also welcome your comments if you feel inspired.

I have always felt motivated to share my woodworking knowledge. I guess it’s in my nature, but there is also a sense of obligation to the taxpayers of California who many years ago funded my woodworking education (and continue to school many others) through the College of the Redwoods Fine Woodworking Program. The blog adds to my book writing and teaching activities in that spirit. Right now you can follow my progress on Guitar Number 26 (an OM body style, acoustic steel-string with Macassar ebony back and sides). Upcoming plans include a rocking chair, viol da gamba, and then, a couple of violins.


Making and Mastering Wood Planes – the movie
A few months ago, woodworker, videographer, and good friend, David Esposito spent a week with me in my shop shooting a companion video version of my book, “Making and Mastering
Wood Planes”.
There is no denying, when it comes to hands-on skills, actually seeing it donegenerates insights and reveals nuances that reading alone cannot fully convey. Mr.
Esposito’s talents behind the camera and as an editor artfully realized the promise behind this statement. The video focuses strictly on the nuts and bolts of plane-making and use, while closely following the general outline and approach of the book. The book has proven its worth, aiding thousands of woodworkers in their plane-making, and meshes well with the video as a bench-top reference and self-paced instructional guide. Furthermore, it provides considerable instruction on related fundamentals of fine woodworking not found in the video. You might consider purchasing a video, book, and plane iron at the same time – with a combined order you save on shipping and you will have everything you need to dive in deep and learn to make and use this most wonderful tool, the wood hand plane — what James Krenov referred to “as the cabinetmaker’s Stradivarius.” Click here 
to order and for  more information.


Buying Opportunities
I have newly focused on the Internet as my primary sales vehicle. This eliminates intermediaries and saves me on the costs and time commitments of shows. The savings allow me to offer these works-on-hand at attractive new pricing. Several pieces have sold already, below are what remain. Click on an image for more information.

Wall-mounted Jewelry Cabinet

Con-Sho Lantern

Pagoda Jewelry Box


Private Instruction
I’d like to invite you to come and spend a day in my shop, or perhaps even a week. Lately, quite a few folks have decided to do just that. We’ve covered the basics like plane-making and use,
frame and panel work, and dovetailing, and we’ve also gotten into more advanced techniques like band-sawn veneers and building a glass-front Krenov-style wall cabinet. Coming up are sessions on designing and making cabinet-stand legs, coopering and incorporating a coopered door into a cabinet, and building a hall table. Perhaps you are interested in scheduling your own personally tailored private workshop? Click here for info on cost and mechanics. (Pictured: Mr. Edward Murchison)

Plane Auction
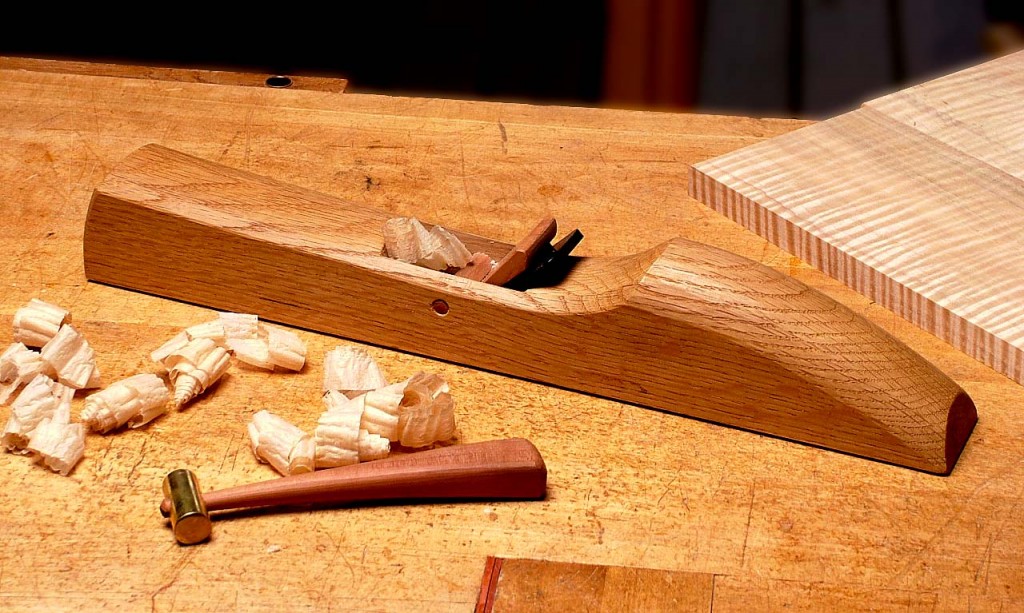
My alma mater, the College of the Redwoods Fine Woodworking Program supports deserving students through the James Krenov Scholarship Fund. Many years ago I held a sealed-bid auction of a plane I made during a plane-making workshop. A fellow went home with the plane, and the proceeds of the sale benefited the scholarship fund. I tried this idea a few weeks ago, simply advertising the auction with a small notice on my web site.  This was also successful and resulted in the sale of a sweet little polishing plane and hammer for $276. If you wish to be notified when there is a plane up for auction, drop me an e-mail and I will put you on a notification list. Right now, I am offering the pictured 17-inch jointer-plane  made of exceptionally dense red-oak. The wood came from a windfall on my parent’s WV property where I worked for many years. We processed this wood over 20 years ago, so it is very well seasoned!  The plane has a wedge and cross-pin of applewood and is fitted with one of my 1-1/2″ wide A-2 steel cryogenically treated blades. I made a little adjusting hammer with a pearwood handle and brass head to go with it.

Here’s the plane in action, it really sings!

The bidding is now open with a starting price of $175. The auction concludes on Wednesday, April 25th at 9:00 PM EST. To join in just send me an email with your bid. I’ll keep the current price updated on my “News and New Work” page. In case of a tie, the plane goes to the first received of the high bids. Payment can be made by check, credit-card, or PayPal. Shipping is an additional $12.00. The winner gets a handmade plane and hammer. I donate the wood and my labor. The proceeds (minus the cost of the plane iron — $56) go to the scholarship fund.

I hope we may cross paths down the road!

David Finck
www.davidfinck.com


Posted in Newsletters | Leave a comment

Guitar Number 26 — 7th Installment — The Neck

I want to apologize in advance having gotten pretty lazy with the camera-work as my time to work on the guitar has gotten pretty limited of late — lots of teaching, not as much woodworking!  A fair amount of steps went unphotographed as I found a little time here and there to push the work along. I’ll document these steps more fully the next time around. I use the typical spliced neck joint and this is the glue-up:

As you can see in this shot, several steps have been accomplished:

First, the heel block was built up. I use a vertical seam with 2 pieces rather than stacking 3 or 4 pieces horizontally (in relation to the plane of the neck). The seam is aligned with the center-line of the neck and the visible end-grain is book-matched for an elegant symmetrical appearance. After truing, I cut the tenon on the tablesaw and rout the channel for the torsion rod which will be accessed through the sound-hole. Threaded inserts were also epoxied into the tenon for bolting on the neck.

You can also see that the fretboard has been slotted, shaped, and inlaid. I use two simple routing jigs (the fretboard is atop one of them) that help me produce the fretboard taper, neck taper, and also gives me bridge placement down the road.  Small pins are used to locate the fretboard and neck to the jigs and to each other.  The wider piece of ebony will cover the peg-head.

The fretboard is unglued, but properly aligned on the neck with the aforementioned pins. I am testing the fit of the tenon and making sure that the neck is aligned with the center of the body.  If you are observant, you’ll notice a miscalculation with the rosette — I mistakenly stopped the ends short of terminating under the fret-board. They will need to be extended – a pain, but do-able (this comment applies to most errors a craftsman must fix!). The peg-head veneer has been glued on now and the peg-head rough shaped.

Next comes the heel-cap. I angle the end that butts against the body, prior to gluing, then glue it with the neck bolted in place to ensure a tight fit with no trimming necessary. This shot also nicely illustrates the book-matched end-grain of the built up heel block.


The frets are installed while the board is supported by the routing template. The file-holding jig in the background is used to angle the ends of the frets.  The torsion rod is installed in the neck and then the fretboard is glued on. The holes for the tuners were also drilled.

Until next time!
df
Posted in Guitars | Leave a comment

Guitar Number 26: 6th Installment — Binding

It’s time to install the bindings on the guitar. I glued a veneer of red-dyed holly to a strip of thicker applewood for my material.  The bindings are then cut on the band saw. This fence utilizes a magnet at each end to clamp to the table — twist to activate the magnet, reverse to deactivate it — very handy.  A piece of 1/4″ plywood run through the cut and then taped in place creates a “zero-clearance” throat opening to prevent the thin binding strips from snagging in the throat opening.

After each cut, a couple of passes with a plane on the shooting board gives one smooth surface to each strip of binding.

I am also using some black/white strips for purfling on this guitar. They were too tall as supplied so I needed to reduce their width a bit.  I did all at once with this little planing jig which is essentially a clamp that holds the strips tightly while supporting them for planing.  The jig is two halves joined by a spline that aligns the two halves and creates a floor to support the purfling strips.  Three screws supply the clamping pressure.

The bi-color shavings are sweet!

I use “economy” packing tape” (the thinner stuff) to hold the bindings in place while gluing them on the guitar. It has a nice stretchy clamping action to it and I like the fact that it’s transparent and I can see how tight the joint is. The guitar is supported by a vacuum clamping jig which holds the guitar steady for both the routing and gluing phases of binding installation, while also giving unencumbered access.

This view shows a bit more clearly what’s going on with the jig. Each suction cup is on a post that can be adjusted for height. This allows me to get the guitar sides as perpendicular as possible to the jig base. That will come in handy for routing the binding channels when I one day make another jig to hold the router that will slide around on the vacuum jig base

Coming down the home stretch here with the binding and trying out the binding tape supplied by Stewart-McDonald.  It does the job well, but I still prefer my packing tape.


Here’s the completed binding and purfling job scraped clean:


Until next time!
df

Posted in Guitars | 5 Comments